

Introduction of How Test a Transistor
How Test a Transistor ~ In the world of electronics, transistors play a crucial role as building blocks for amplifiers, switches, and digital circuits. Whether you are a hobbyist, student, or professional technician, understanding how to test a transistor is an essential skill. A faulty transistor can cause a circuit to malfunction, leading to performance issues or complete failure. Thankfully, with a multimeter and the right method, testing a transistor is a straightforward process.
This guide will explain how to test a transistor step by step, including the difference between NPN and PNP transistors, how to identify terminals, and how to verify their functionality. By the end, you will be confident in checking transistors for faults and ensuring they work properly in your projects.
What is a Transistor?
A transistor is a semiconductor device used to control current flow. It has three terminals:
- Base (B) – The control terminal.
- Collector (C) – The output terminal.
- Emitter (E) – The reference terminal that provides charge carriers.
There are two main types of transistors:
- NPN Transistor – Current flows from collector to emitter when a small current enters the base.
- PNP Transistor – Current flows from emitter to collector when current leaves the base.
Understanding the type of transistor you are testing is crucial, as the testing procedure differs slightly between NPN and PNP.
Why Test a Transistor?
Before using a transistor in a circuit, it’s important to test it for the following reasons:
- Prevent Circuit Failure – A bad transistor can damage other components.
- Save Time – Identifying faulty components early helps in faster troubleshooting.
- Ensure Reliability – Testing ensures the component will perform as expected.
Common signs of a faulty transistor include overheating, short circuits, no current flow, or abnormal resistance readings.
Tools Required for Testing a Transistor
To test a transistor, you will need:
- Digital Multimeter (with diode test function preferred)
- Transistor Datasheet (optional, for pin configuration)
- Breadboard (optional, for easier handling)
Step-by-Step Guide: How to Test a Transistor
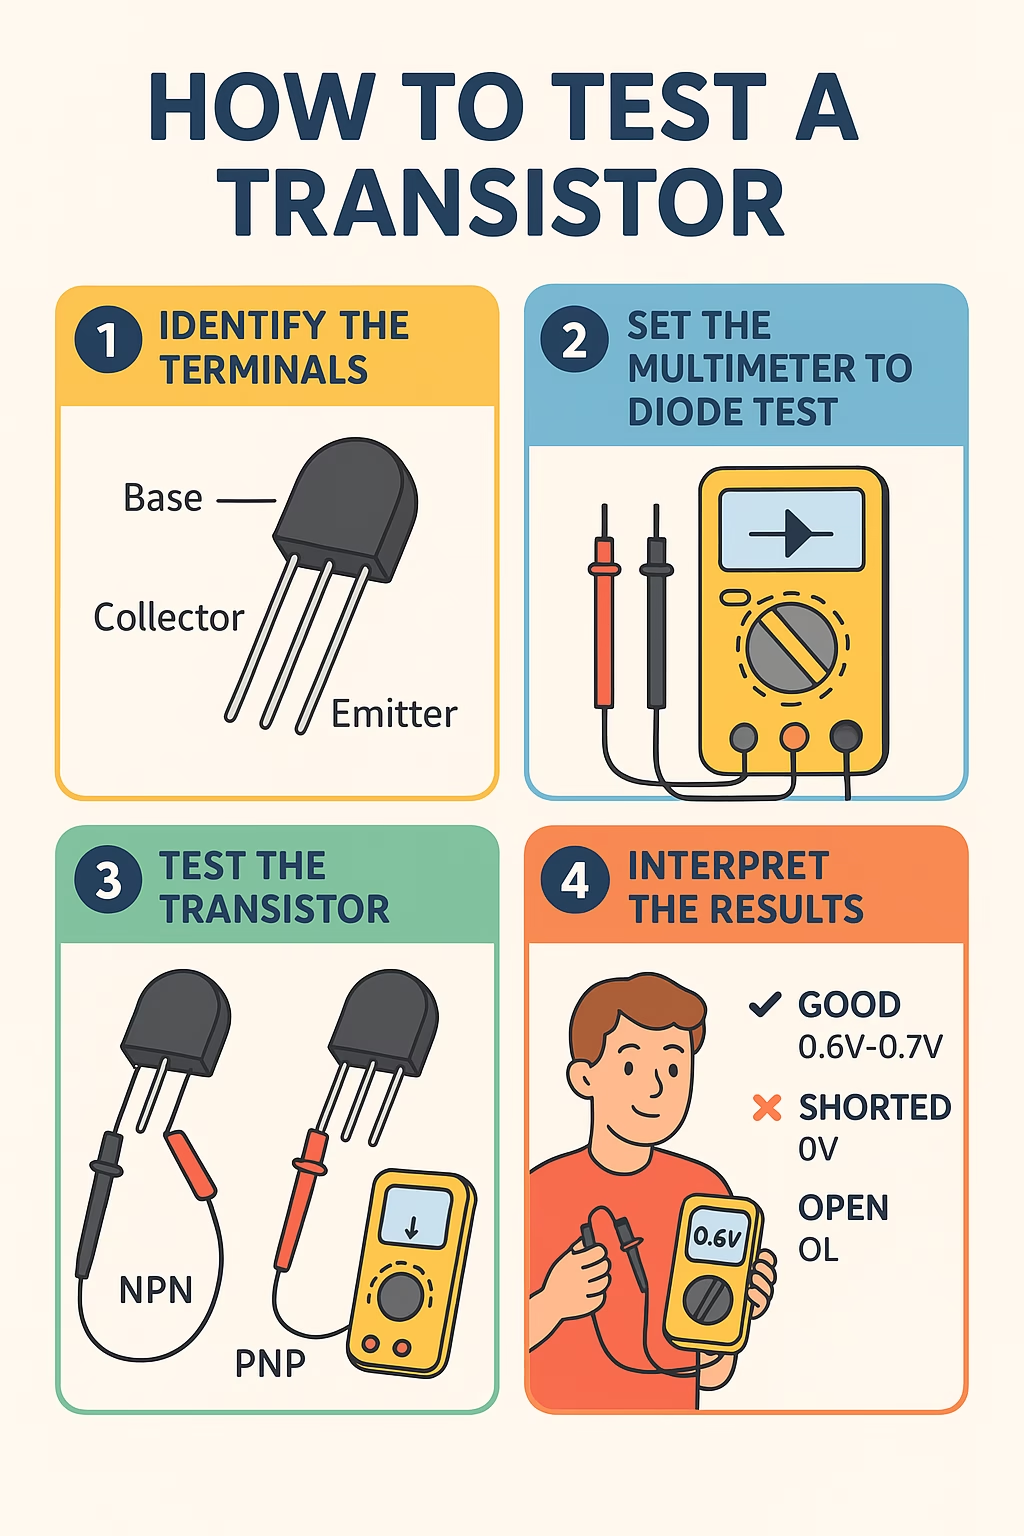
Step 1: Identify the Terminals
Each transistor has three terminals: base, collector, and emitter. Check the datasheet or use a multimeter to identify them if not marked. Typically, the flat side or markings on the transistor can help determine the pinout.
Step 2: Set the Multimeter to Diode Test Mode
Most digital multimeters have a diode test mode. This function is perfect for testing the PN junctions inside the transistor.
Step 3: Testing an NPN Transistor
- Place the positive (red) probe on the base and the negative (black) probe on the collector.
- A good NPN transistor will show a reading of about 0.6V – 0.7V.
- Keep the red probe on the base and move the black probe to the emitter.
- Again, you should see 0.6V – 0.7V.
- Reverse the probes (black on base, red on collector/emitter).
- The meter should show OL (open loop) or no conduction.
- Check between collector and emitter directly.
- Both directions should read OL in a good transistor.
Step 4: Testing a PNP Transistor
- Place the negative (black) probe on the base and the positive (red) probe on the collector.
- You should see a reading of about 0.6V – 0.7V.
- Keep the black probe on the base and move the red probe to the emitter.
- Again, expect 0.6V – 0.7V.
- Reverse the probes.
- The meter should read OL in both cases.
- Check between collector and emitter.
- Both directions should read OL for a healthy transistor.
Step 5: Interpret the Results
- Good Transistor – Shows proper forward voltage (0.6–0.7V) and no conduction in reverse.
- Shorted Transistor – Shows near 0V in all tests.
- Open Transistor – Shows OL in all directions.
- Leaky Transistor – Shows abnormal low resistance where it should not.

Additional Testing Methods
1. Resistance Test
If your multimeter lacks a diode test mode, use resistance mode. A good transistor will show low resistance in forward bias and high resistance in reverse bias.
2. hFE (Gain) Test
Some multimeters have an hFE socket for measuring transistor gain. While this is not a full reliability test, it helps verify if the transistor amplifies as expected.
3. In-Circuit Testing
If removing the transistor is difficult, you can sometimes test it in-circuit. However, results may be inaccurate due to surrounding components.
Tips for Accurate Testing
- Always test the transistor out of the circuit for best accuracy.
- Double-check the pin configuration from the datasheet.
- Avoid touching the probes with your fingers as it may affect readings.
- Compare readings with a new transistor if in doubt.
Common Applications of Transistors
Understanding transistor testing becomes more valuable when you realize their wide applications:
- Amplifiers in audio systems.
- Switching circuits in microcontrollers.
- Power regulation in power supplies.
- Signal modulation in communication systems.
Because transistors are everywhere, the ability to test them ensures smooth operation of countless devices.
Conclusion of How Test a Transistor
Testing a transistor is a fundamental skill for anyone working with electronics. Using just a digital multimeter, you can quickly determine if a transistor is functional or faulty. By following the steps outlined in this guide, you can confidently test NPN and PNP transistors, interpret results, and troubleshoot electronic circuits with ease.
Whether you are repairing a device, building a new circuit, or learning electronics, knowing how to test a transistor is a valuable addition to your technical toolkit.